Tools
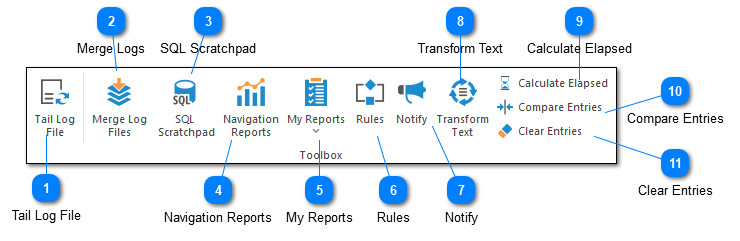
The actions toolbar contains the list of actions you can use for the currently selected view.
Tail Log File

The tail log file command allows you to start or stop monitoring the current file for changes. Monitoring the file is the same as the UNIX tail command, which means new entries which are written to the file will be displayed in LogViewPlus as soon as they are written.
Auto-scroll is used to determine whether LogViewPlus should automatically scroll to new log entries as they are written. Note that auto-scrolling is only possible when a log file is in tail mode.
To enable auto-scroll, you simply need to select the last log entry currently in the view. An easy way to do this is to select the auto-scroll command from the quick access toolbar located in the top left corner of LogViewPlus. Alternatively, you can select the bottom of the Navigation Bar.
Merge Logs

The merge logs command is used to merge two or more log files into the same view. This makes it easier to work with multiple log files which are related to the same application. Executing this command will open the merge file selection window.
SQL Scratchpad

Launches the SQL Scratchpad which can be used to query your data. Generated SQL statements can be used in custom reports.
Navigation Reports

Navigation Reports a set of reports which are common to most log files. For example, a report showing log entries over time. Navigation Reports are distinct from Reports which are generally more static and business focused. Navigation reports can help with data navigation by automatically filtering your log file.
My Reports

If you have configured LogViewPlus to generate custom reports, those reports will be available for execution. This command will only be visible if custom reports have been configured.
Rules

Rules can be used to associate actions with a filter. For example, you could use a rule to change the background color of all log entries matched by a filter. Please see the Rules for more information.
The Rules command will be enabled if a filter is selected or if the current log file has rules applied. Based on the selection type, the command will either open the Rule Wizard or the Rule Manager respectively.
Notify

The notify command is used to create an alert when a new log entry is detected in a filter. This allows you to passively monitor a filter. For example, you could filter a log file for errors and be notified when a new error is detected.
Transform Text

Opens the Transform Text dialog which allows you to convert log entry data from one format into another. For example, you could use the Transform Text to convert parsed IDs into SQL statements.
Calculate Elapsed
Calculates the amount of time that has elapsed between the two selected log entries.
Compare Entries
If you have configured LogViewPlus to use a compare tool (like WinMerge) the Compare Log Entries command will save the two selected log entries to separate files and open the files using your configured tool. This is helpful for quickly determining the difference between two log entries.
Clear Entries
The clear entries command removes all entries from the log entries grid. This is helpful if you want a fresh view on the current log file. For example, the application has recently been restarted and you are not concerned with previous log entries.